Vivado Installation
Vivado is required for synthesizing bitstream for FPGAs - both for Microwatt and for A2O.
The following steps are derived from the Vivado Design Suite User Guide: Release Notes, Installation, and Licensing (UG973)
Downloading Vivado
Download Vivado 2025.2 from AMD/Xilinx. This will require you to register and provide your details before downloading. All PowerCommons projects are built and tested with Vivado 2025.2. It is recommended to download the Single File Download if you will be creating multiple WSL instances - it will save you significant amount of time as you dowload the installer only once. However, this requires more disk space. If you don’t have a fast internet connection or have limited disk space, you can download the Unified Web installer for Linux.
Note
You need to dowload the Linux version even if you are using Windows as you main operating system. We will copy the installer to WSL Linux once we’re ready to install.
Assuming you are on Windows and downloaded the installer to `C:\Downloads\FPGAs_AdaptiveSoCs_Unified_SDI_2025.2_1114_2157.tar“, copy the installer to WSL instance. You can do it by running the following command from inside WSL Debian instance:
>cp /mnt/C/Downloads/FPGAs_AdaptiveSoCs_Unified_SDI_2025.2_1114_2157.tar ~
or if you downloaded the web installer:
>cp /mnt/C/Downloads/FPGAs_AdaptiveSoCs_Unified_SDI_2025.2_1114_2157_Lin64.bin ~
This will copy the installer to your home directory in WSL 2 Debian instance. Note this might take a few minutes depending upon your disk speed.
Installing Vivado Prerequisites
Before you actually install Vivado in your WSL 2 instance, install the prerequisites. In many cases, the installer can fail if the required libraries are missing. Vivado 2025 includes a script to check for and install any missing libraries. For both the Unified Single File Download (SFD) and the Webinstaller, the installLibs.sh script is located at the image root. To access the image root area with the Webinstaller, use the following command in batch mode on a Linux machine to extract the image.
><Download_Dir>/FPGAs_AdaptiveSoCs_Unified_202X.Y_MMDD_HHMM_Lin64.bin –keep --noexec --target <WI_Client_Dir>
Replace <WI_Client_Dir> with the target directory where you want to extract the files. Alternatively, if you are using the tar file, you can extract the files as shown below:
> tar -xvf FPGAs_AdaptiveSoCs_Unified_SDI_2025.2_1114_2157.tar
Once the files are extracted, you will find a script called installLibs.sh. This script will install all the libraries required for Vivado installation.
> cd FPGAs_AdaptiveSoCs_Unified_SDI_2025.2_1114_2157
>  sudo ./installLibs.sh
[sudo] password for power2people:
ubuntu-24 install
Hit:1 http://archive.ubuntu.com/ubuntu noble InRelease
Get:2 http://archive.ubuntu.com/ubuntu noble-updates InRelease [126 kB]
Get:3 http://security.ubuntu.com/ubuntu noble-security InRelease [126 kB]
Get:4 http://archive.ubuntu.com/ubuntu noble-backports InRelease [126 kB]
Get:5 http://archive.ubuntu.com/ubuntu noble/universe amd64 Packages [15.0 MB]
Get:6 http://archive.ubuntu.com/ubuntu noble/universe Translation-en [5982 kB]
....
....
Preparing to unpack .../5-libsecret-1-dev_0.21.4-1build3_amd64.deb ...
Unpacking libsecret-1-dev:amd64 (0.21.4-1build3) ...
Setting up libgpg-error-dev (1.47-3build2.1) ...
Setting up libsecret-common (0.21.4-1build3) ...
Setting up libsecret-1-0:amd64 (0.21.4-1build3) ...
Setting up gir1.2-secret-1:amd64 (0.21.4-1build3) ...
Setting up libgcrypt20-dev (1.10.3-2build1) ...
Setting up libsecret-1-dev:amd64 (0.21.4-1build3) ...
Processing triggers for libc-bin (2.39-0ubuntu8.6) ...
Processing triggers for man-db (2.12.0-4build2) ...
Processing triggers for install-info (7.1-3build2) ...
INFO: For more information please check /home/power2people/FPGAs_AdaptiveSoCs_Unified_SDI_2025.2_1114_2157/installLibs.sh_2025-12-13_15-36-28 log.
Now you are ready to install Vivado.
Vivado Installation
To launch the vivado installer, lanunch the installer binary as shown below:
> sudo chmod +x FPGAs_AdaptiveSoCs_Unified_20XX.Y_MMDD_HHMM_Lin64.bin
> ./FPGAs_AdaptiveSoCs_Unified_20XX.Y_MMDD_HHMM_Lin64.bin
Alternatively, if you downloaded the SDI tar file, launch the installer from the folder (FPGAs_AdaptiveSoCs_Unified_SDI_2025.2_1114_2157) extracted above:
>./xsetup
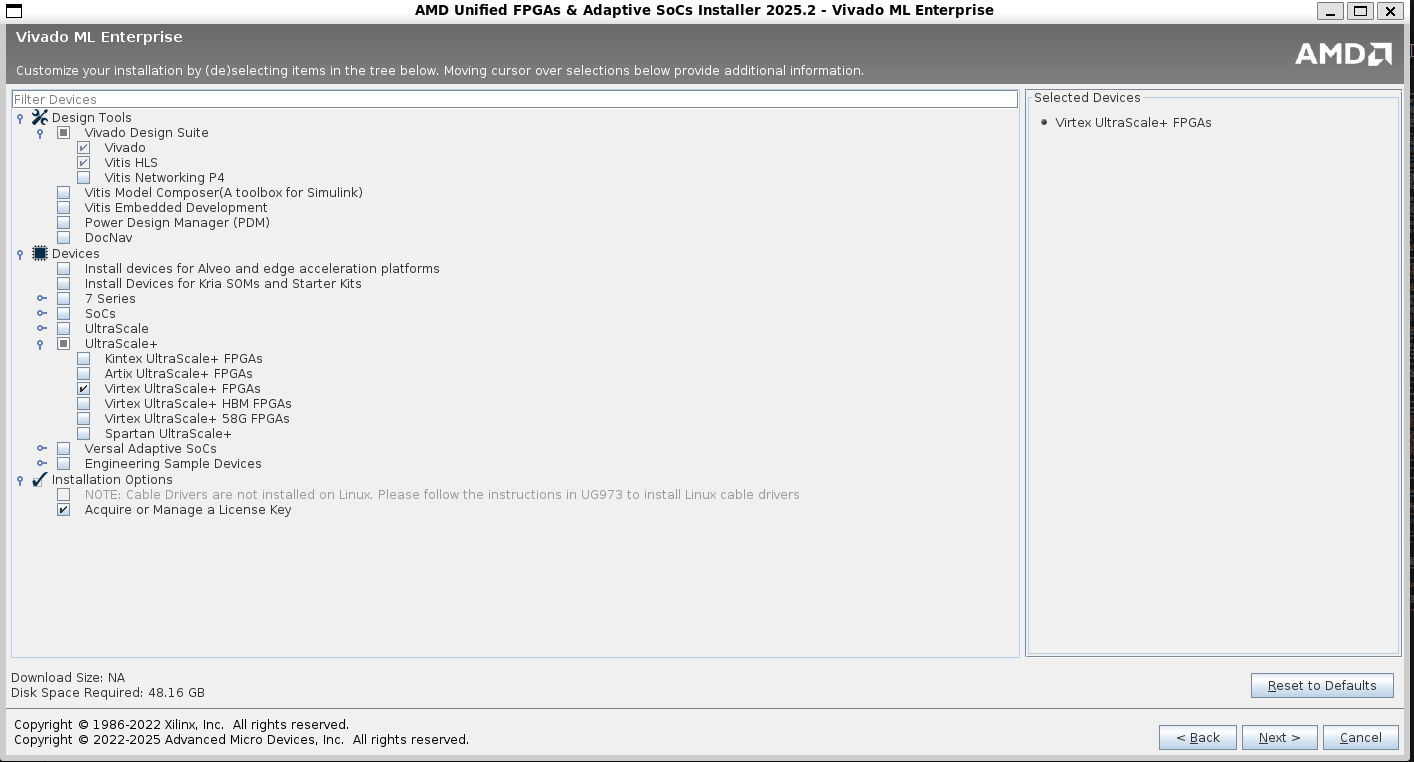
From the list of products to install, select Vivado. Note that you only need Vivado to work with PowerCommons projects - you don’t need Vitis or any other products. On the next screen, choose Vivado ML Enterprise if you have a license or alternatively choose Vivado ML standard. Remove any unnecessary Vitis or other components - you only need the minimum components as shown below along with components specific to your FPGA device (Ultrascale+ in this case).
Click next to continue.
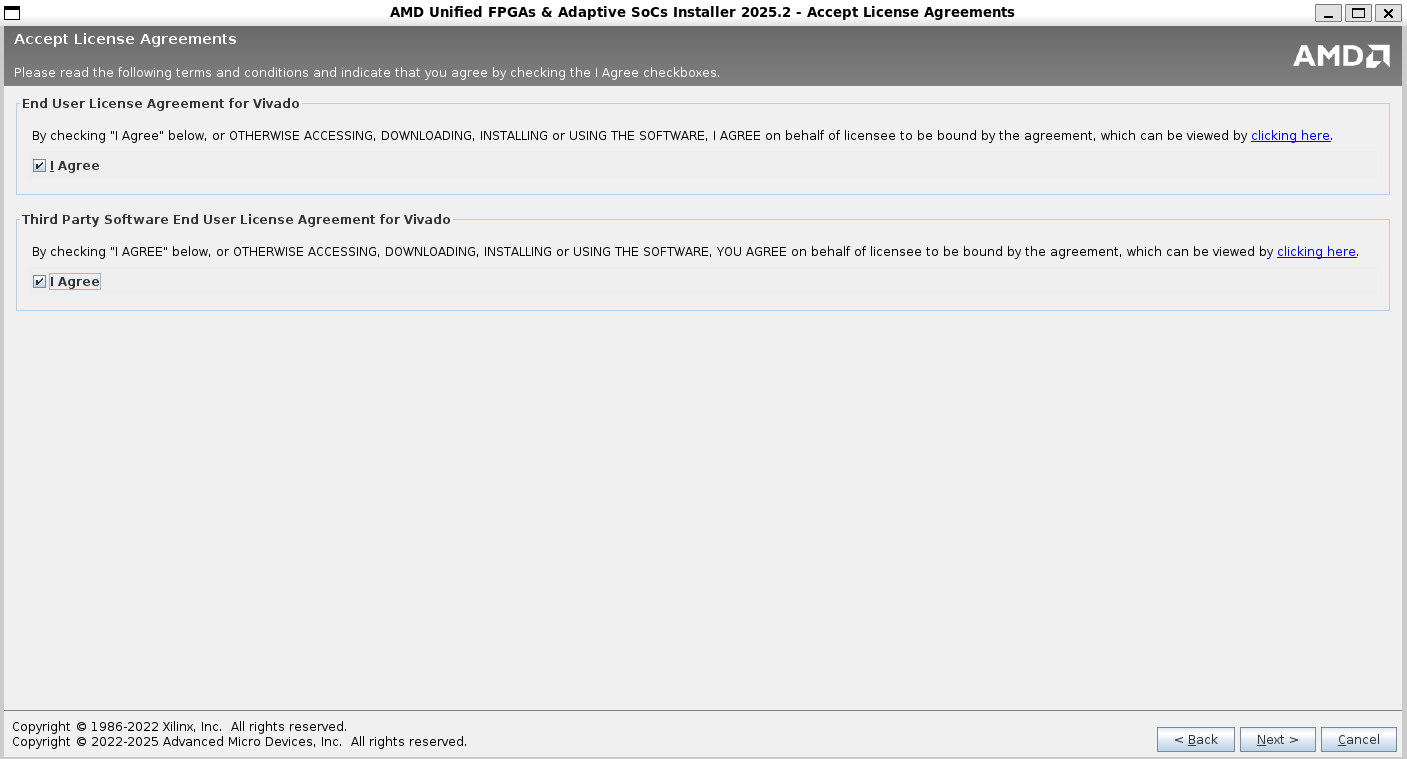
Accept the license and usage terms, click next to continue.
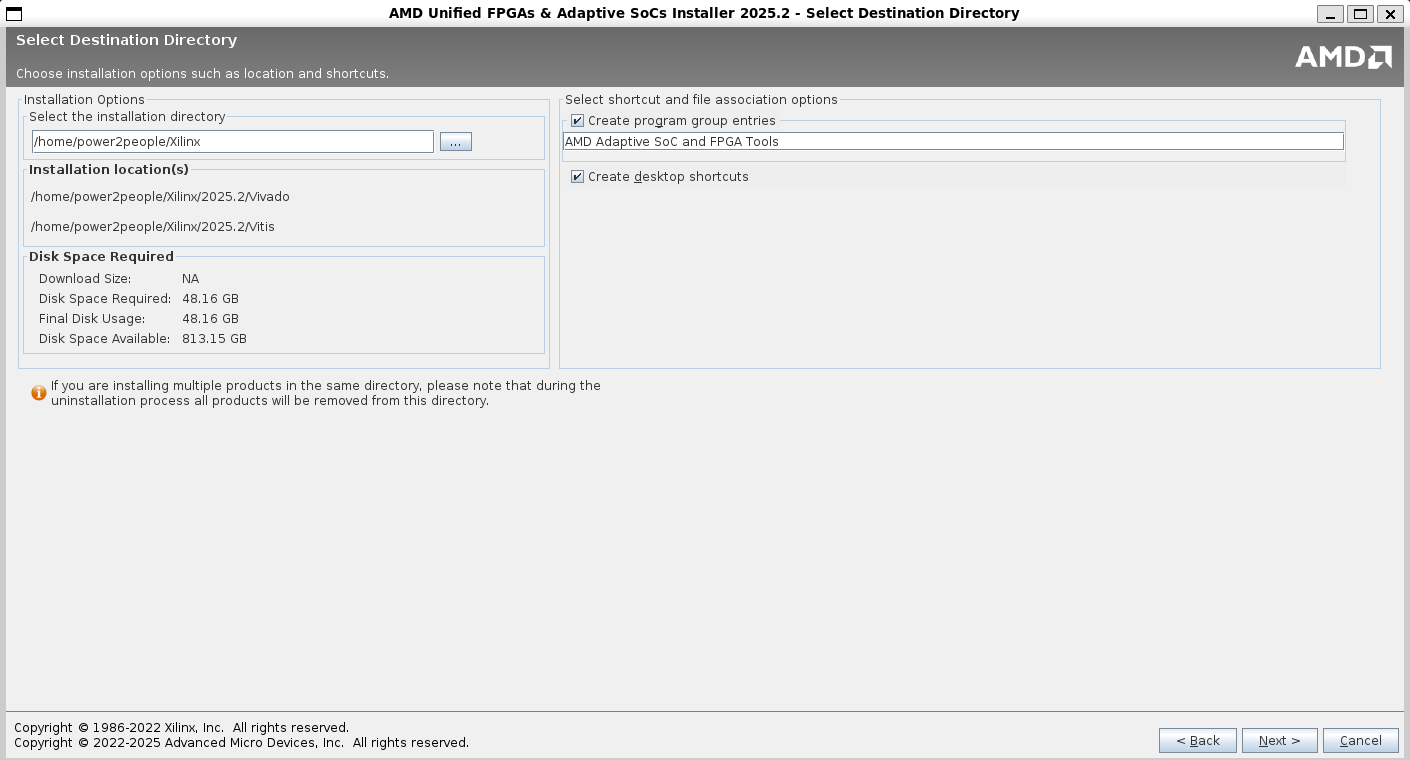
Specify an installation directory and click next to continue.
Review the installation summary and click Install to start the installation. Wait for the installer to download the files in case you are using web installer - it can take 30-60 minutes or even longer on slower internet connections.
Setting up Vivado Paths for terminal utilities
Once the installation is complete, add Vivado to your path. The following assumes you are using bash on WSL 2 but the process is similar for other shells too:
# Open your .bashrc file in vim editor
> echo 'source <PathToXilinxInstallationDIR>/Vivado/2025.2/settings64.sh' >> ~/.bashrc
Replace PathToXilinxInstallationDIR with the path to Xilinx installation folder from the previous step.
Installing USB drivers and pass through on Windows
The final step in Vivado installation on WSL is to allow USB passthrough from Windows to WSL 2.
Install USBIPD on Windows 11
Note
Vivado is not supported on ARM platforms. Please make sure you download the installer for your AMD/Intel based machines.
Go to the USBIPD Release Page and download the latest x64 installer for Windows. You may get a warning asking you to confirm that you trust this download. Run the downloaded usbipd-win_x.msi installer file. Running the installer will install:
- A service called usbipd (display name: USBIP Device Host). You can check the status of this service using the Services app from Windows.
- A command line tool usbipd. The location of this tool will be added to the PATH environment variable.
- A firewall rule called usbipd to allow all local subnets to connect to the service. You can modify this firewall rule to fine tune access control.
List all of the USB devices connected to Windows by opening PowerShell in administrator mode and entering the following command. Once the devices are listed, select and copy the bus ID of the device you’d like to attach to WSL.
usbipd list
Before attaching the USB device, the command usbipd bind must be used to share the device, allowing it to be attached to WSL. This requires administrator privileges. Select the bus ID of the device you would like to use in WSL and run the following command. After running the command, verify that the device is shared using the command usbipd list again.
usbipd bind --busid 4-4
To attach the USB device, run the following command. (You no longer need to use an elevated administrator prompt.) Ensure that a WSL command prompt is open in order to keep the WSL 2 lightweight VM active. Note that as long as the USB device is attached to WSL, it cannot be used by Windows. Once attached to WSL, the USB device can be used by any distribution running as WSL 2. Verify that the device is attached using usbipd list. From the WSL prompt, run lsusb to verify that the USB device is listed and can be interacted with using Linux tools.
usbipd attach --wsl --busid <busid>
Open Ubuntu (or your preferred WSL command line) and list the attached USB devices using the command:
>lsusb
You should see the device you just attached and be able to interact with it using normal Linux tools. This should be sufficient to access the device from Vivado and other utilities. However, in some cases, you may need to configure udev rules to allow non-root users to access the device.
Once you are done using the device in WSL, you can either physically disconnect the USB device or run this command from PowerShell:
usbipd detach --busid <busid>
To learn more about how this works, see the Windows Command Line Blog and the usbipd-win repo on GitHub.
Warning
You will have re-bind the USB device if you re-start or disconnect your FPGA board.
Install Digilent Board files
This step is only required if you are using any of Digilent Boards such as Arty A7 100T. If you are using Xilinx boards such as VCU-118, skip this step.
To install BSP files, launch vivado from WSL:
>vivado
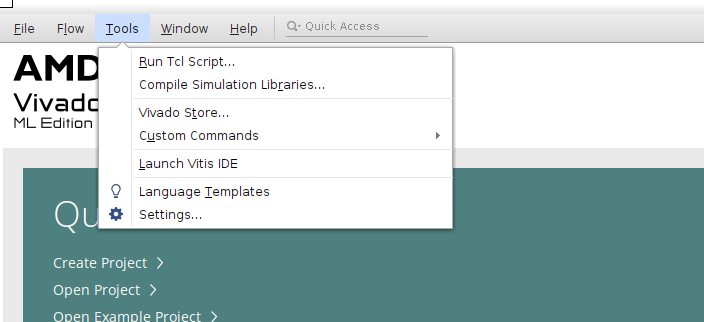
Once Vivado starts, select Vivado Store from the Tools menu:
Check the “Don’t show this dialog again” checkbox and click ok.
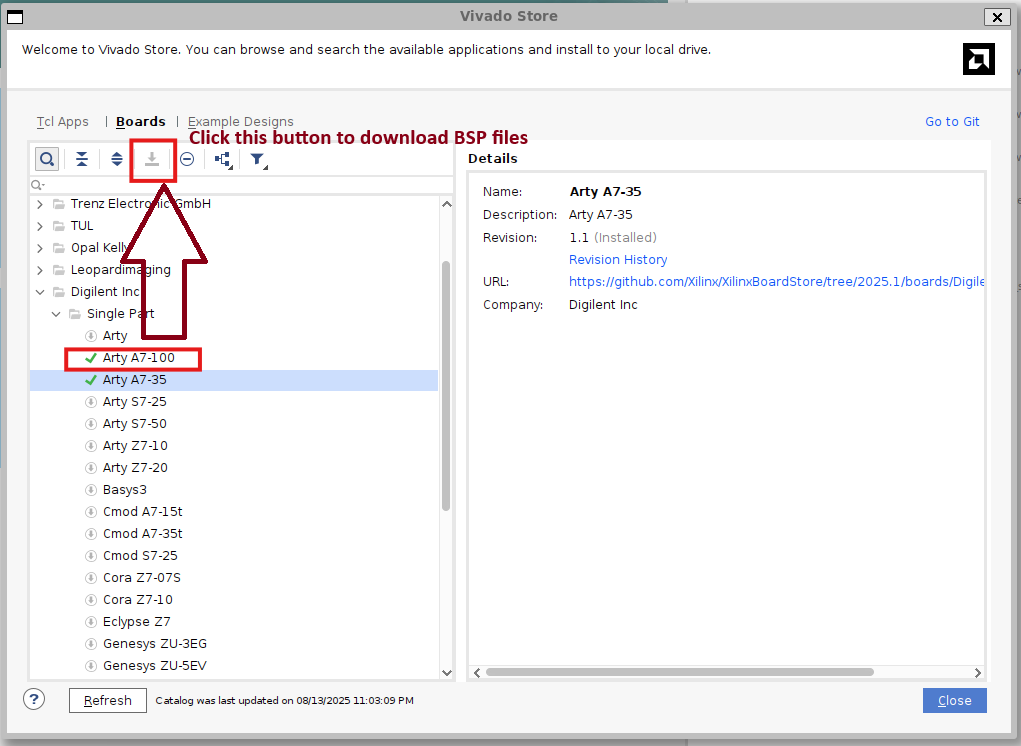
In the Vivado Store Window, click on “Boards Tab”. In the left tree pane, look for Digilent Inc. Expand the tree node and then expand the child “Single Part” tree node and look for your device. For example, if you are installing for Arty A7 100T, select the device from the tree and click on Download button on the top. Once the donwload button finishes, you will see a green tick against the device name indicating the BSP files have been installed. Click close and exist the Vivado Store.
Next Steps
Version Compatibility
PowerCommons projects target Vivado 2025.x. Using older versions (2023.x, 2024.x) may require constraint updates.